Showing posts with label van bodywork. Show all posts

Friday, April 10, 2009

Before and After

OK, here it is;
BEFORE


AFTER


Not bad, eh?

Tuesday, March 24, 2009

Battery Box


Here is the battery box I built, with 3 - 12v marine batteries each 105 amp hours.
An amp hour means you can run something that draws 1 amp (or 12 watts) for an hour.
I will have 315 amp hours in my system, so if I wanted to know how much energy I was using to run a 60 watt lightbulb on my 12v power system, it would use 5 amps in an hour, or 5 amp-hours. If I wanted to use a 500 watt heater, it would use 41.6 amps per hour. (500 watts divided by 12 volts) So I could only run my heater for about 6 hours before my batteries were dangerously low.
Amps X Volts = Watts
so Watts divided by volts equals amps.

I highly recommend the 'Boatowner's Mechanical and Electrical Manual' by Nigel Caulder. It is not a cheap book, but if you own or are building a boat, RV, or Freedom Van it is a great investment. It has detailed information and drawings, diagrams and pictures on all critical systems; 12volt and 120 volt electrical systems, solar panels and wind generators, propane heating and refrigeration systems, plumbing, troubleshooting, and diesel engine repair, among others.

They can explain all this better than I can.

My batteries will be connected in parallel, with the positive terinal of one connected to the positive terminal of the next, and negative to negative.
This will give me 315 amp hours at 12 volts.
There will be a positive cable attached to the van's starting batteries, and running through a battery shut off switch to the positive terminal at one end of my 'house bank' of batteries.

Cheap Battery shut off switch from Harbor Freight
(the nice ones are $50.00 at West Marine, this was $5.00. Hope it doesn't burn shit down.)


This will let me charge the house bank with my alternator when the switch is on, and turn the switch off when I quit running to avoid draining my starting batteries while I run lights or heat up water in my hot pot. All interior lighting and electrical (inverter) will be run from the house bank.
The house bank will also be backup power to help the van start if for some reason the starting batteries should die. Just turn the battery switch on, and crank 'er up. (as long as I didn't leave my heater on all night, then I'd be SOL.)

The battery shut off switch, inverter and terminal strip will be mounted to the sides of the battery box, aft of the seats. My drink holder gets mounted to the front of it! :)
I don't have the top on yet, but it will be hinged on the forward side so it opens to the aft, so I can maintain the batteries or add electrical components. There will be another smaller box on top that will double as a seat and center console compartment that opens toward the front. I've got to have someplace to keep maps!

Time is running out. I probably won't get a chance to mount the solar panels for my back up charging system, but I will take them with me. Maybe I can do it in Washington (for all the good they'll do up there).

I'd better get back to framing up the kitchen....

Monday, March 23, 2009

Construction


I haven't posted for a while. I've been really busy.

All my friends now know I am leaving the state in about 2 weeks, so they all want to spend time with me. I love my friends, but time spent hanging out is time I could be spending on the van.
I have accomplished a good bit though.

After installing the final piece of sub floor, I built a battery box, painted it and glassed it in. It fits between the two front seats, and holds three large (105 amp hour) deep cycle batteries. I want it to be waterproof inside, so any corrosion or leakage stays put. I really don't want battery acid to leak on the van or my stuff. All the water leaks I found when it rained have been sealed.

I finished insulating and closed the walls in with paneling. It almost looks liveable! I have been cutting up 2X4's for internal frame structure, and today I am applying the last coat of paint before they are installed.
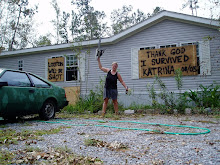
The van now smells like a new house; fresh wood and paint, instead of a moldy old vehicle. I found a flood line on both seats when I was cleaning, so my suspicions that she's a Katrina victim are confirmed. The Beast is a SURVIVOR.

It's a beautiful day to paint; sunny and warm and a little breezy. Bugs and dried up sweet olive flowers stick to it, but that's OK. I'm not going for perfection. The van will just carry a little bit of Louisiana with us, wherever we may roam.

Getting closer.......

Tuesday, March 17, 2009

Rain


It finally quit raining. All the plants really needed the rain, and they are rejoicing in spring today.

The rain did cramp my style with the van. It was a good leak test though. I found out I need to seal the seams where the very rear of the van body connects with the main body. I also need to remove the running light fixtures and silicone around them. I'm spending a lot of time de-leaking this van, but it will be worth it. I had a van in Key West that leaked like a sieve, but was my shelter when the weather was too rough to go back to the boat. A leaky van getting all your crap wet really sucks in Key West, but it can be deadly in Northern climates. This van has to keep out Washington rain.
There are several leaks in the seams of the firewall in the cab, so I still have more work to do there, but I got the massive holes fixed. My cab has a floor again! Now I just need the van to dry out so I can grind and prep.

It is rather disorienting to watch the road go by beneath your feet when you are driving.

Just don't look down.

It was a big fiberglass project. I used about 3 sq yards of fiberglass mat, one yard roving (heavy cloth) and 1 yard cloth. It's about 8 layers of fiberglass. Each side took about 3 hours to lay up. The resin roller was critical for this project, and gave me a much more solid repair. It was close to 1/4" thick when I drilled through it for the seat holes.
Mayberry mentioned on a comment how expensive West Systems is, and yeah, it 'aint cheap. I spent about $200 on a gallon of resin and quart of hardener. But it doesn't stink like polyester resin, I get a perfect cure every time because it is pre measured, and it bonds to metal much better than polyester. Polyester is the way to go if you're building a boat, or repairing a polyester resin boat. My pick for vehicle repair and metal bonding is West Systems Epoxy, so long as I can afford it.
Now I'm waiting for paint to dry. I should be able to re-install the seats by this afternoon, then I can get my last piece of plywood cut for the floor/battery box.
And once I have seats I'll be able to drive somewhere to get the wall paneling and continue on the interior.

Monday, March 9, 2009

Van Status


I got lots of work done on the van today. Yesterday I removed the old weather stripping from the back doors, sanded, prepped and painted them. Today I installed the new weather stripping, repaired and glassed in the other rear corner, fixed 3 other holes, got another interior frame board cut and painted, and started insulating.

The end of fiberglassing is in sight. There is one hole left to fix out of fourteen fiberglass worthy holes. The Holy Hippie veggie van is almost hole free. There is still some fairing and painting to do to the fiberglassed areas, but I'm ALMOST done slinging fiberglass.

I am using several layers to insulate. I used spray adhesive to attach Reflectix (shiny bubble plastic) to the outer walls of the van. I sort of felt like I was enclosing myself in a giant tinfoil helmet while doing this. Maybe it was just the adhesive fumes....
The next layer is pink, 3/4" foam cut to fit between the frame members of the van. This will be anchored with Great Stuff spray foam once I get my wall paneling cut to fit.
Any voids I cannot readily access, like inside the metal frame members of the van, get filled with 'Great Stuff'.
Lots of good progress today. Maybe I should wake up to leather clad Mel Gibson every morning...
..................................Yum.

Saturday, February 28, 2009

New Floor


I got my new floor cut out and "dry fitted" in the van. I wanted it to be a pretty tight fit because I don't want to bolt it down and make more holes in the van.
It was tricky to get it just right, because there are weird shaped fuel fills and wheel wells to cut around. So I made a pattern for each side out of newspaper and traced it onto the plywood. It turned out pretty good.
Now I will apply "Great Stuff" expanding foam to the grooves in the floor of the van and hold the plywood down with my deep cycle batteries as the foam sets. (they weigh about 80lbs apiece)
The foam adheres to things pretty well, so between it and the tight fit I shouldn't need to bolt it down. Yay! I get to cut wood!

A couple interesting things happened the last few days. I was in the Qwik-e-mart buying my cancer sticks and the customer ahead of me was talking to the cashier about being overtaxed and finding a safe place for their money. The cashier mentioned an account in the carribean. I chimed in with "I'm just investing in food and ammo." They both looked at me, but not like I was crazy. More like they were considering it.

Then our 'crazy neighbor' came over wanting to know how many of the 4000 rounds of AK ammo he ordered the Ex wanted. Gun conversations went on for a while, then the neighbor told a story about how he met these guys in a diner who were talking about ammo. The guys were initially suspicious and asked if he was a cop, but it was readily apparent that he was one of the good ole' boys. So they invited him to the range. They have some kind of 'gun club' and a 'facility' in Mississippi. I wonder if it's anybody I know online?....
It was some consolation that if/when TSHTF, the Ex will team up with CN (crazy neighbor) and maybe be able to bug out to MS with da' boys. Ex and CN are going to the range tomorrow. Awwww.... I've given up him, but I still care if he lives or dies. It's encouraging to see him making helpful connections at least.

Thursday, February 19, 2009

Prepped and Primed


My floor is all glassed in, prepped, primed and ready for a sub floor. It's been rainy a lot this week, so I lost some days, and fixing the rest of the exterior holes in the Holy Hippie Veggie Van became a priority. What's the sense in putting in a floor if it'll just get messed up when it rains? So today I ground out and de-rusted the rest of the holes where the rain comes in.


And stops my mind from wandering....


This weekend they will get glassed in. It shouldn't take that long, so maybe I'll be able to install the sub floor too.

Prep work is always a pain in the ass. It takes the longest and is the least satisfying. But the final result always depends on laying a solid foundation. Prep work is critical. Just the same, I will be ecstatic when I get to cut wood to build my interior. That should go a lot faster.

My plan is to install a basic framework for the bunk and kitchen areas that is attached to both the frame of the van and the sub floor. After wiring, I can insulate and put up paneling.

Then I can start to think about finishing cabinets/storage/shelves and what type of flooring I want to install. Woo Hoo!
"Engineer the future now, damn tomorrow, future now. Throw the switches, throw the Judge, yesturday's for mice and Gods." -Clutch

Sunday, February 8, 2009

MY floor won't drop out

I've nearly finished prepping the floor of the van. It has been de-rusted and given a coat of primer. I just need to finish sealing all the joints and seams with fiberglass, then one more overall coat of primer. Sealing all the seams may be overkill, but this van is my future house. I'd rather overkill than wish I'd done better, later. Do it right, do it once. The next step is to install a plywood sub floor, which will level out the current uneven state of the floor, and serve as a secure attachment point for my interior structures.
I have also taken painstaking measurements, so I can draw the van to scale and come up with a "floor plan" for the bed/kitchen/cabinets/battery box, etc. I will also determine where I need wiring, so I can install it before I put up the insulation and "walls". I've always liked scale drawing. I've used it in innumerable carpentry projects, and did a stint as a landscape designer for a while. Drawing and writing are great tools in my creative process. They help me generate ideas, see what will work and what won't, and think through the constuction process so I don't leave out critical steps.
Measure twice, cut once.

Sunday, February 1, 2009

Spoiler


I have completed the first layup of my rain catching van "spoiler". I still need a few more layers of fiberglass to get the height and strength that I want, then a good bit of grinding and fairing to make it look halfway decent. But already the van leaks less and rattles less. She grows stronger by the day.

I used a piece of the steel trim that holds up the interior ceiling panels as support for my new gutter. I applied blue tape and spray-on cooking oil to the trim first, to keep it from becoming a permanent part of my fiberglass artwork.

As it begins to cure and solidify I squish air bubbles out of it and encourage it into the shape I desire. When it starts to get fairly stiff I will add another layer to "hot batch" it all together.

If the epoxy is allowed to cure completely, it is necessary to give it a light sanding and wipe it down with acetone to remove the 'amine blush' that will prevent the next layer from making a good bond.

I didn't think it was possible, but my van is even uglier than it used to be. Nothing says classy like uneven patches of gray primer, and strings of fiberglass flying in the wind....

I actually enjoy the fact that it is so ugly as to be offensive to all the sheeple in their Hummers and Escalades. It's sort of fun to watch pedestrians tremble in fear when they consider crossing in front of me. If I didn't anticipate stealth parking I wouldn't even paint it, but anyone who sees it parked on their street now is definitely going to think a serial killer lives in it and call the cops.

Eventually it will get painted 'Desert-ed tan' which is a flat paint the color of dust in the desert. It will still look scary, just not serial killer scary.

I've got to get the interior liveable first though.

"Count down, America, where are you now? Minuteman, please show me how, to wash this blood from my hands, make it go away. The evils of my forefathers pale to those today."

Clutch - 'Arcadia'

Sunday, January 25, 2009

The Rust speaks

I've been treating the rust as bad. It is eating my van. But it also has a story to tell, like anything else.


Rust is the memory of water. Where there is rust there was water, and likely will be again. Water is the stuff of life. Oxidation (rust) is vital to life processes.


This rust is telling me that if I pay attention, I might thank it later.


My van has a pattern of rust around the roof that is familiar to anyone who owns an older van. The two back corners are the worst, at the lowest points where the little van gutter encourages water to sit and work its oxidizing magic.


I'm sure it isn't coincidence that I have been reading about the desert (thanks rube!) and water catchment and cisterns. If I want my van to be as self sufficient as possible, why not include catching water? Obviously plenty of water takes a certain path across my van.


So instead of hating the rust, I let it inspire me. My van will have a sort of 'spoiler' across the back that prevents most water from going off the back. It will be diverted to the rust spots about a foot forward of the corners, where it will be released into pipes running into water tanks. I still need to work out the details. This idea has just hatched.

The water may not be drinkable, but as long as the van is clean and not in a polluted area I don't see why it wouldn't be.
Brilliant! Thanks rust!

Saturday, January 24, 2009

Epoxy is awesome


After being served a notice of seizure way too early in the morning, yesturday continued to get even weirder. Suffice it to say that the Universe lit a fire under my ass. Events conspired to point me in one direction; get ready to get outta Dodge, fast. I figure I have about 1 month. My deadline is technically March 25th, but the sooner the better.

So today I am working with fiberglass. I was going to learn to weld, but that requires time to learn, expenses for materials and tools, and I already know how to work with fiberglass since I lived on a boat for two years.

I prefer West Systems epoxy resin. It has several important advantages over polyester resin; It has nifty measuring pumps, so you don't have to measure hardener and possibly get a batch that doesn't cure, it is technically stronger and more moisture resistant than polyester, and it doesn't smell anywhere near as nasty. Naturally it is also more expensive, but I already had some.

With any sort of finish or repair, surface preparation is 90% of success. So I ground the paint down to bare metal, cleaned the entire area with acetone, and filled the deep cracks by the wheel wells with Great Stuff expandy foam. The cracks were then filled with epoxy thickened with colloidal silica and shaped to a smooth surface.

I brushed unthickened epoxy on the areas to be fixed, and started applying fiberglass. It is a good idea to have fiberglass pieces cut to the size of the hole BEFORE you mix the epoxy. It has a limited working time before it starts to cure. After each pice of fiberglass is applied, you add more resin to "wet out" the fiberglass, thoroughly saturating it with resin. There are rollers available to squish out air bubbles and extra resin, but I prefer to massage it, squishing it around with my hand. It's more fun, cheaper, and works just as well. Of course I wear gloves. Epoxy is extremely sticky, and permanently attaches to anything it touches; metal, wood, hair or skin.

I used both fiberglass cloth and glass mat in repairing this hole. Cloth is more flexible than mat, but the more directions the glass fibers are going, the stronger the repair. Mat is good for quick build up of indented areas. I always use cloth for the final layer as it gives a nicer finished surface. It is kind of like paper mache', only permanent and waterproof.

So the holy hippie veggie van has one less hole today. And I'm off to grind more rust.

Sunday, January 18, 2009

Rust


This weekend I'm killing rust. It's about time I actually wrote about my van.


My van is a 1985 Ford Econoline E-350. Diesel engine, dual tanks, 6.9 litre, 420 cu. in. with a C-6 transmission, 3 speed automatic. 144,000 miles.


I paid $700.00 for this van. She may be ugly on the outside, but she is beautiful mechanically.


I can reasonably expect to get another 300,000 miles out of this engine, and closer to 500,000 if I treat her right.


I chose this van over a newer model for several reasons. Before 1985 vehicles had no computer chips. Basically this means I can fix it myself. Fords are abundant, parts are relatively cheap, and that was when Ford still manufactured vehicles using good ole' American metals. Things were built heavy, and built to last.


People say vans are difficult to work on. I have not found that to be the case. Anytime I work on this van, I am impressed by the simplicity and by the quality of materials that went into it. Granted I haven't done any serious engine work, but so far, so good. I have replaced the water pump, coolant hoses, accessory drive belts, thermostat, power steering gearbox, and done all the regular maintenance. The transmission fluid looked like a carmel milkshake.


My poor baby, I think she may have been a Katrina victim. Patterns of corrosion indicate she has been sitting for a long time, lonely and neglected. I'm not sure if she flooded and was just too stubborn to give up, or if she was just neglected.


After my minimal maintenance work, she runs like a dream. Gets between 20-24 mpg, which isn't bad for a van this size. Hopefully mpg will improve when I start running WVO/diesel blend.


But now, rust is the biggest issue. You don't really find vehicles 20+ years old that don't have rust issues. So I started grinding.


The process goes something like this; use variable speed sander/buffer with 5" wheel and 24 grit resin wheel. I started with my 12V drill and 3m abrasive bad, but it took forever, was tiring, and hard on my drill. The sander/grinder is a vast improvement, yeilding better results in less time. Vacuum dust with shop vac, apply naval jelly/rust stopper. Wait for it to work (2hrs) then scrub it with clean water and steel wool. Give it a sponge bath to rinse away residual crap/naval jelly/paint or rust flakes then dry thoroghly with a paper towel.


After air dry time, coat prepped surface with rust inhibiting zinc primer. This stuff stinks. I highly recommend a respirator, unless you really like killing brain cells. At the end of the day, I had pretty nice results.
My strategy is a unilateral attack against all rust, eliminating the weakest first. The areas of larger rust will be attacted individually later on.
I also installed my nifty, Ipod ready radio today, which involved much cutting and pounding and filing to make the bracket fit a foreign radio. But hey, you gotta have music. I work a lot harder if I can rock out to Clutch while grinding....
"Doctor or lawer, I'll never be. Life of a drifter, that's the life for me." -'Electric worry'/Clutch
Clutch rocks. Check them out.
Vaminos!